


- GET EXCLUSIVE GOODIES

IN YOUR INBOX
Filed In: DIY
Hairpins & Coffee

When I moved into my first apartment, I was dying for a rustic wood coffee table with a wrought-iron base. No matter where I looked, it appeared that I wasn’t going to find one for less than $300. As a newly-graduated working gal, that was out of my budget.
My dad, being the handyman that he is, helped me build my own tabletop. I spent numerous nights hammering and making the boards look old and beat up. Once the tabletop was complete we put it on top of an old trunk and it’s been in my apartment ever since.
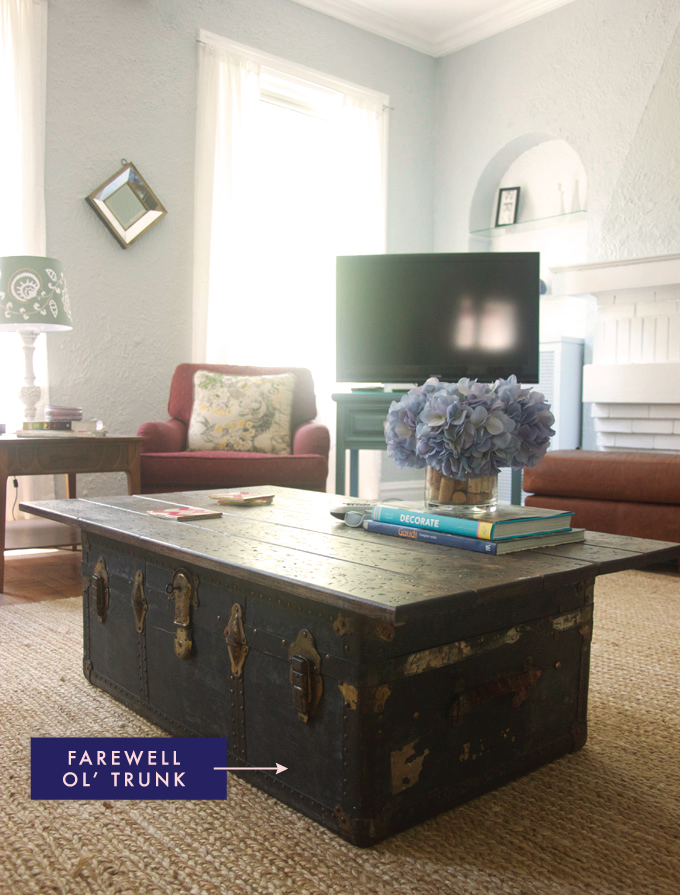
I’ve loved the rustic look of the trunk, but it’s old. One of the handles ripped off in my move to Chicago, the bottom of the trunk snags and rips my beautiful jute rug and in the process of Oliver’s teething stage, he chewed the remaining handle quite a bit. Bottom line? The table needs a little facelift.
I love the combination of rustic and industrial pieces mixed with traditional pieces, so I decided to go with industrial-looking hairpin legs. They’re also a relatively inexpensive way to update a piece. I went back and forth trying to figure out which style of hairpin leg — square rod, ones with little feet, three bar legs — after all the looking, pondering and mind-changing, I decided on the most basic, standard hairpin leg they have. Haha!
Now it’s just a waiting game until they arrive in the mail! I can’t wait to show you the new look!



Fresh Coat of Paint


Two weekends back, I finally tackled those blue side tables. I’d bought the paint weeks before, but it took me a while to finally pull out the tarp and get to painting. I chose a light grey called Cathedral Grey from Behr and I think this time I really hit it out of the park.
After sanding, well, faux-sanding with this de-glosser stuff, I waited the recommended 10 minutes, and then got to painting. I did two coats and the project start to finish only took me about 2 hours, not including the dry time. The toughest part was keeping Oliver away. He did end up with a bit of that cathedral grey on the top of his head and ears, but fortunately he didn’t try to lick it.
The following day was more exciting. With help from my roommate, I put them back in my room to see if the color change was worth my Saturday afternoon. The answer? ABSOLUTELY. The grey makes the whole room softer, more grown up and still a touch girly, but not little girlish. You feel me?
I’m really not a girly girl and I’ve thrown in a few pieces to man it up a bit — my favorite being my antlers above my bed. And okay, there’s actually not that many man pieces now that I look around, but I guess grey is manly, right?
The next step was restyling. Which ended up being more fun than expected! How do you feel about the way I styled it? I’m no pro, but Pinterest has been a huge help. I’m still working on the table that’s on the other side of the bed, it’s looking a bit sad right now, and my second lamp from Land of Nod hasn’t arrived, so the college Hobby Lobby lamp is standing in right now.
I was sooo happy with the project that it ended up kick starting a few of those other dormant projects that have been piling up in my office. This week I’m hoping to get some photos printed from our France/Belgium trip and fill those frames as well as paint a smaller test version of my abstract piece. Eeek, sorta nervous about the latter.
In other exciting news, my velvet fabric came in! Time to get these puppies recovered!
Beautify the Spice Cabinet

I love to cook and being able to easily and quickly find spices in the middle of whipping something up is key. Well, at least it makes the whole process less stressful.

There’s no doubt that our spice cabinet was a complete wreck. We had multiples of every spice in there and all of them were half used. You can just feel the stress building up right? Because of the spice explosion on that shelf, there was no room for the coffee mugs, grinds and sweet and lo to be stored. I finally decided I just needed to clear the cabinets out and start fresh.
Our kitchen has a little shelf under one of the cabinets that’s only use was collecting moldy fruits and veggies. It was the perfect spot to show off our spices, add a bit of color to the whole place and alphabetize them for easy (and stress free!) cooking!

I promised this would be a super easy project. You can make your own labels to suit the spices you’ve got in your cabinet or maybe you have a specific font you want to use. Click here to download the file I used. I personally love this font — sort of rustic! So once you’ve got that file ready, here’s what else you’ll need:
- Labels & a Printer — this print out is sized for Avery 5160 labels
- Spice Jars — I used these, but any little jar with a resealable top is perfect!
- Scissors — for trimming the labels
- Spices — for cooking, of course!

Step 1
Print your labels and trim them. (I included more labels, but the pack of jars that I bought only had 24, so I had a few leftover that I didn’t use.) I cut them each a little bit differently to give them a rustic, cozy kitchen feel.
Step 2
Stick those labels on! I know, so easy, right?

Step 3
Fill your jars with the appropriate spice and get cooking!
This was the perfect little project for a rainy day. It’s so quick and so easy and makes your spice cabinet look far more attractive. I think these would be absolutely perfect for anyone who has open shelving. It let’s your kitchen look organized and adds a nice little pop of color from bright & exotic spices!
For more DIY projects, visit the gallery!







 The Fox & She is a style and lifestyle blog written and curated by Blair Culwell.


