


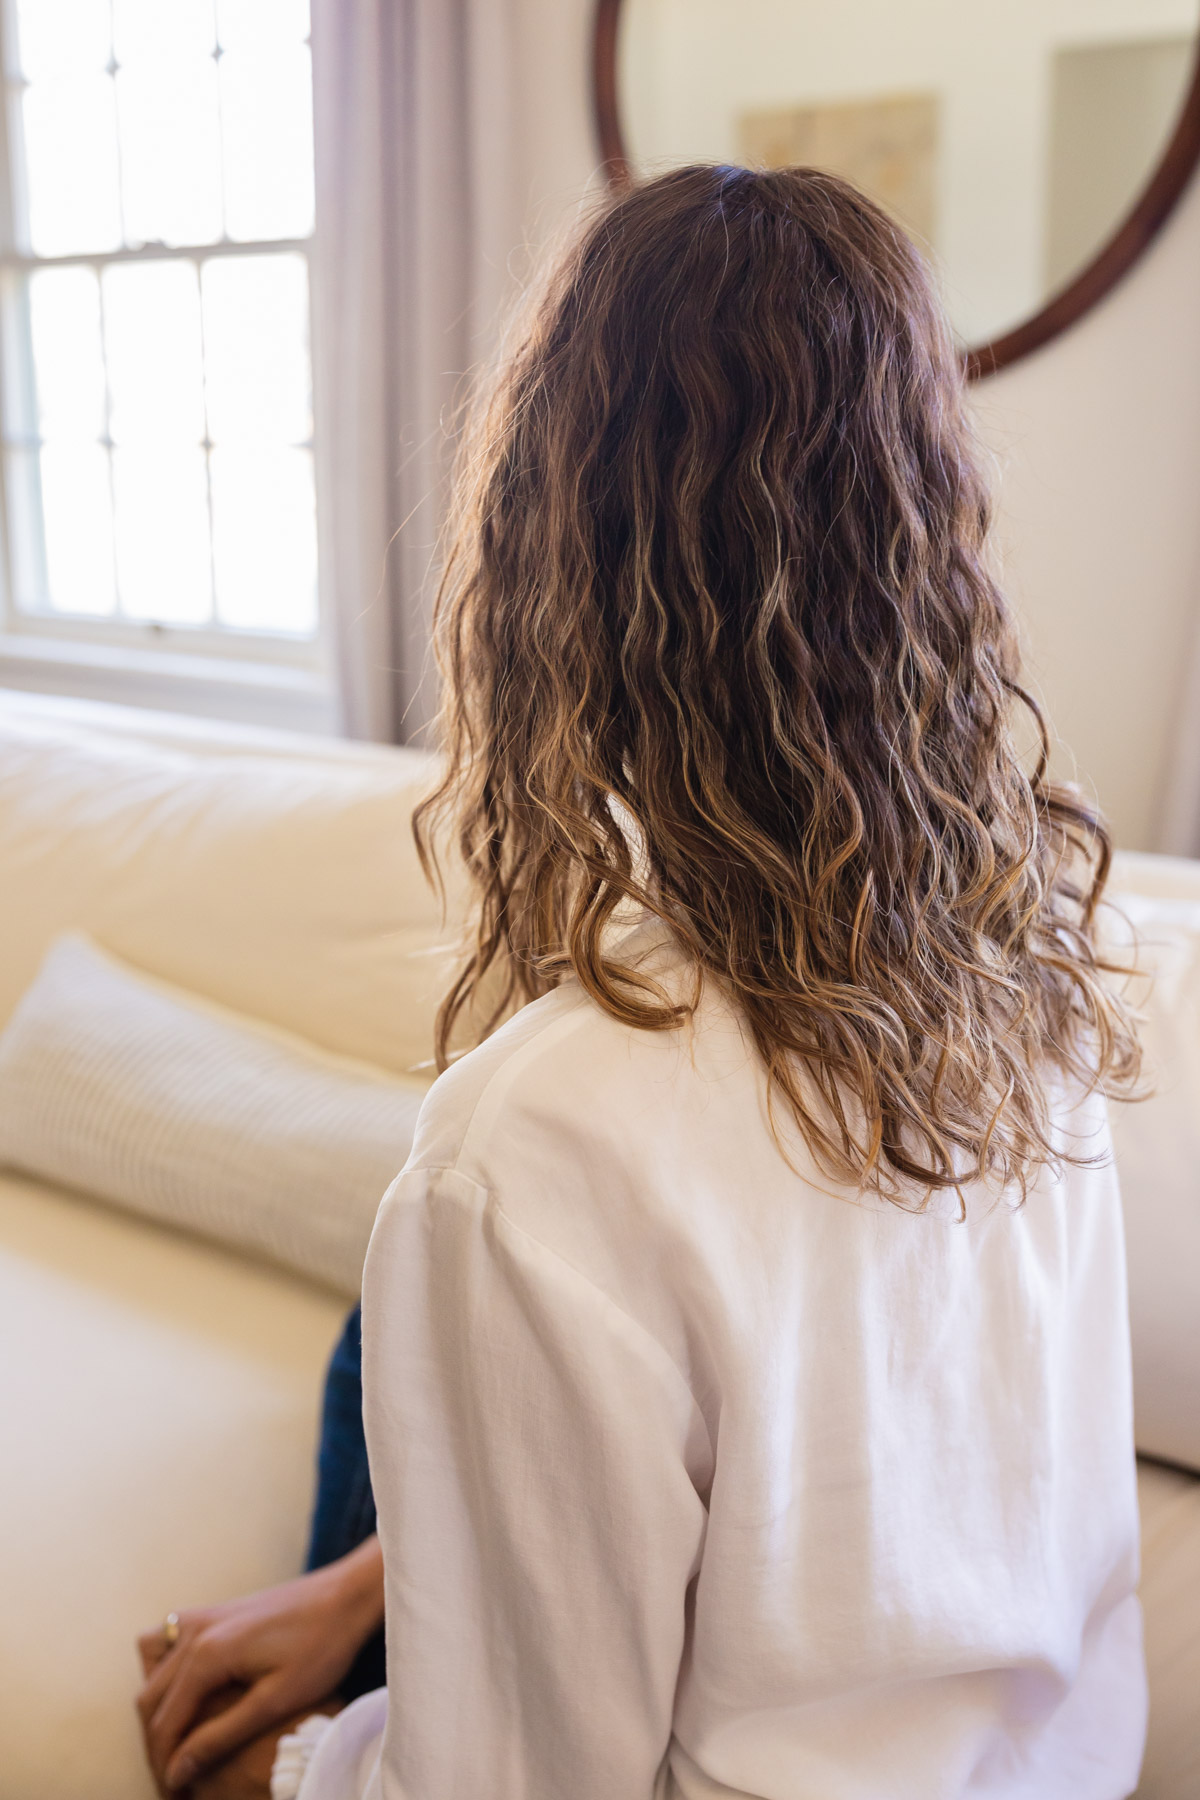
For anyone looking to embrace their natural hair, this wavy hair routine is simple and easy and results in gorgeous soft waves with minimal effort.

This year I decided to finally start embracing my wavy hair instead of straightening it several times a week. I’d dealt with some hair loss and figured giving my hair a break wouldn’t hurt to help me get healthier hair. Plus, I’d come across some wavy-haired influencers that made me want to give my natural hair type a serious go!
It’s such a beautiful hair type, but if you have wavy hair, you may have struggled with styling your hair like me.
For too long, I felt like if my hair was wavy that it felt messy or unkempt. What I didn’t realize is that was really just because I wasn’t doing much to care for my waves or style them. I was sleeping on them wet (a big no-no!) and praying that when I woke up they’d look somewhat decent.
Spoiler alert, this was a terrible strategy and usually resulted in me waking up with wild, crazy and unmanageable hair that I would ultimately straighten again.
Thankfully I wised up and started digging deeper on what to do to keep my waves looking their best and keeping my hair extra healthy. I’ve found a really good wavy hair routine that gives me consistently beautiful results for perfect hair days every time and I’m sharing it with you.
For the record, I’m so not a hair person, so if I can do this, so can you!
Wavy Hair Routine for Soft, Bouncy Waves
If you have wavy hair, you know that achieving that perfect balance of bouncy soft waves can be a bit of a challenge. But, this wavy hair care routine will help you achieve a great look every time!
The key to getting beautiful waves starts with a healthy scalp. If you have any dry, itchy patches or areas where your hair isn’t growing, or your hair is falling out, take a look at this post to start focusing on your overall scalp and hair health.
If you’re dealing with overly dry and frizzy hair, you’ll want to focus on conditioning. This routine will help you tame your waves, while also giving you different options to choose from for your particular hair needs. Let’s dive into this hair care routine for wavy hair girlies!
Step 1 of my Wavy Hair Routine: Detangle Your Hair
Before you hop in the shower, you’ll want to detangle your hair.
Detangling your hair before washing is an essential step in reducing hair fall and hair breakage. When hair is tangled, it becomes more prone to breakage as the knots and tangles can cause stress and tension on the hair shaft. This can ultimately lead to breakage and hair fall when washing or brushing.
It’ll make your hair more manageable and less prone to breakage during the washing process. It also prevents the formation of more knots and tangles while shampooing and conditioning, which can further reduce breakage.
Using a wide-tooth comb or a detangling brush, start from the ends of the hair and work your way up to the roots. For extra stubborn tangles, apply a detangling spray or conditioner to help ease the process.
By taking the time to detangle your hair before washing, you can maintain the health and strength of your hair, reducing the risk of breakage and hair fall—something I’ve personally been working on. It also makes the hair washing process a lot smoother and more enjoyable.
Step 2: Pre-Wash Treatments, Optional
While these are totally optional, they’ve become an essential part of my wavy hair routine. These help to ensure your scalp is nourished and revitalized. Since hair health starts at your scalp, these can be really great things to add to your routine.
One option is a scalp and hair oil treatment, which involves applying a nourishing oil to the scalp and massaging it in to promote healthy hair growth and hydration. You leave it on for a few hours and then wash it out and proceed with your routine as normal. If you want to learn how to make your own hair oil for growth, check out this post, it’s much more affordable than buying one.
Another option is applying a scalp detox hair serum, like this one or this one—I actually love and have seen great results with both of these. You section your hair and apply to the scalp and massage in. This helps to remove build-up and impurities from the scalp, leaving it clean and refreshed. I had this one itchy spot that wouldn’t go away and after a few scalp detox sessions, it’s perfectly fine!
Another treatment to try is using the Nuderma high frequency wand with the comb attachment. This can help to stimulate the scalp and improve circulation to encourage growth and blood flow. This tool is also great or skin as well!
Lastly, I like to incorporate a scalp massage with both of these. You can simply use your fingers, or a scalp brush. This massage can help to increase blood flow to the scalp, promoting hair growth and relaxation.
Step 3: Shampoo & Condition
If you have wavy or curly hair, you may have considered using a specific wave or curly shampoo and conditioner. While these products can help enhance and define your natural waves or curls, they are not absolutely necessary for wavy hair in my experience.
Regular shampoos and conditioners can still effectively cleanse and moisturize your hair, so feel free to use whatever products work best for your hair type and concerns. I typically opt for cleaner products that are free from harsh chemicals, like a sulfate-free shampoo and have been used and loved Vegamour, Prose and Act + Acre products.
One important aspect of hair care for wavy or curly hair is the conditioning of the ends. Wavy and curly hair tends to be drier than straight hair, and the natural oils from the scalp have a harder time traveling down the length of the hair strands.
This is why it’s crucial to focus on conditioning the ends to keep them moisturized, bouncy, and soft. Using a rich and nourishing conditioner on the ends of your hair can help prevent dryness, frizz, and breakage, making your waves or curls look and feel their best.
Use a Deep Conditioning Hair Mask Once a Week
Can I just say that this step is a GAME-CHANGER?!
I love using this deep conditioner hair mask once a week to maintain the health and shine of my hair, especially on the ends. Over time, our hair can become dry, damaged, and prone to split ends, and a weekly hydrating hair mask can help combat these issues and keep your hair looking and feeling its best.
Wavy (or curly) hair textures can be more prone to frizz and dryness, so this is an amazing addition to keep your strands hydrated and shinier, especially with continued use.
To use a hair mask, start by shampooing your hair as usual and then gently wringing out any excess water. Then, apply a generous amount of the hydrating hair mask to the ends of your wet hair, making sure to thoroughly coat them. You can also massage the mask into your scalp if you have a dry or flaky scalp. I typically skip the scalp because my hair is fine and this can weigh it down, but it’s up to you!
Once applied, leave the deep conditioning hair mask on for the recommended amount of time, usually 5-10 minutes, to allow the deep conditioning ingredients to penetrate the hair shaft and provide maximum nourishment.
After that, rinse the hair mask out thoroughly and style your hair as usual. You should notice an immediate difference after this deep conditioning treatment in the softness and shine of your hair, and with continued use, your hair will become stronger, more manageable, and less prone to breakage. I wish I had known this earlier! It’s such an easy step and has made such a big difference for me.
Step 4: Apply Styling Products
Styling products are essential for achieving gorgeous waves. The first time I used them, I thought—if only I had known this my entire life! They can help with adding volume, shaping curls, or taming frizz—the right styling product can seriously make all the difference.
Don’t get intimidated here, I’m very much new to this and I promise it’s super simple!
Favorite Styling Products for Wavy Hair
Moisturize with Curl Cream or a Leave-In Conditioner
Using a hydrating curl cream or leave-in conditioner is essential for anyone with curly or wavy hair. My stylist told me that her number one product for wavy hair is a leave-in conditioner because wavy and curly hair types tend to be dryer.
This product helps to moisturize and nourish the hair, keeping it healthy and vibrant. Without extra moisture, curly and wavy hair can become dry, frizzy, and difficult to manage. This is an essential step for your wavy hair routine.
Curl cream also helps to define the natural curl or wave pattern of the hair, enhancing its texture and overall appearance. This is especially important for those who want to embrace their natural curls or waves and use less heat that can cause damage.
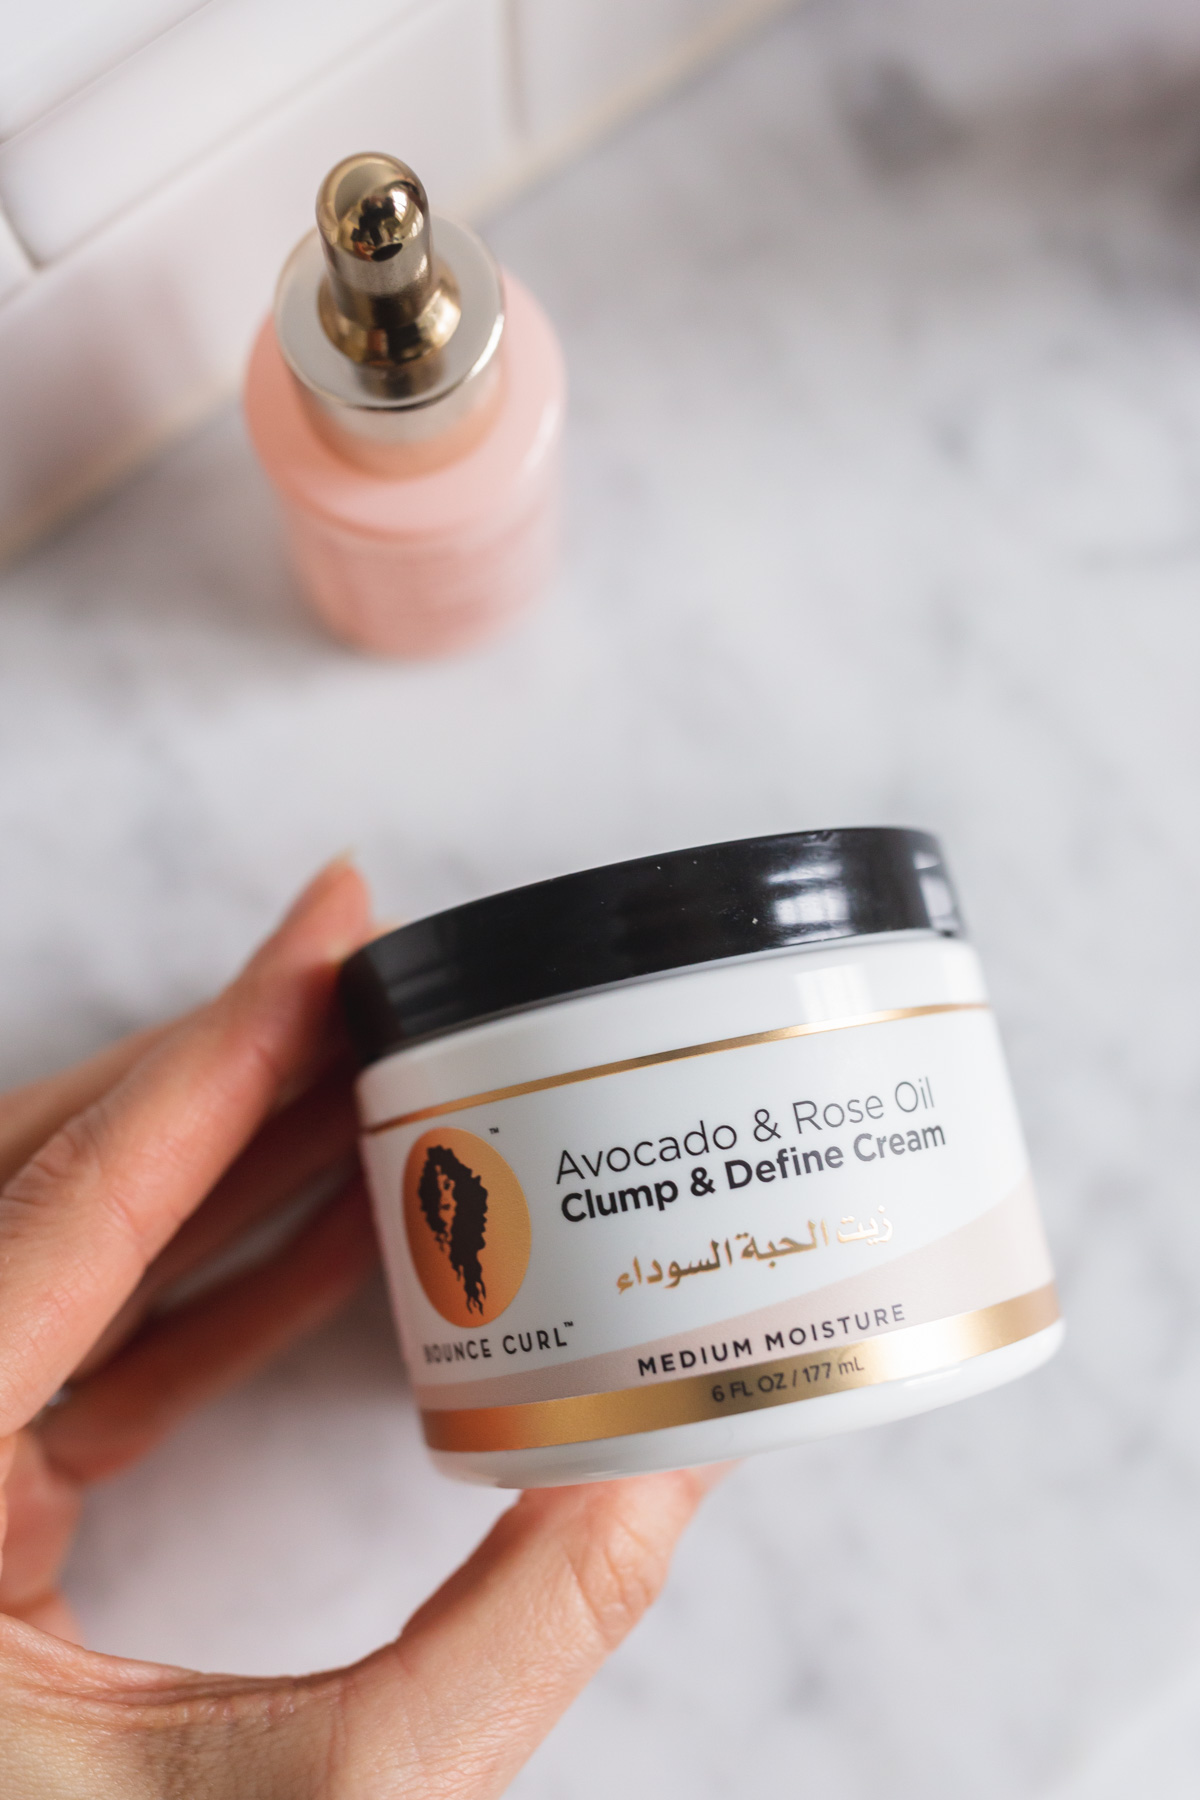
My go-to hydrating curl cream is this Bounce Curl Cream. I use about a quarter-size amount for my medium-length hair. The tub says that it’s highly concentrated so you don’t need to overdo it.
The biggest perk of this in my opinion is that it adds moisture to my hair without weighing it down or feeling greasy. I’ve noticed more defined, healthier, shinier hair over time, and it just keeps getting better and better.
How to Use: After you get out of the shower, gently brush your hair, but don’t dry it much. Scoop out the desired amount of product and work through your hair with your fingers.
Add Gel or Mousse to Style
I used to be totally against using gel or hair mousse, but I’ve found that not only do they help my hair keep its shape and last longer, there are products out there that don’t give you that crunchy feeling you sometimes expect with products like this.
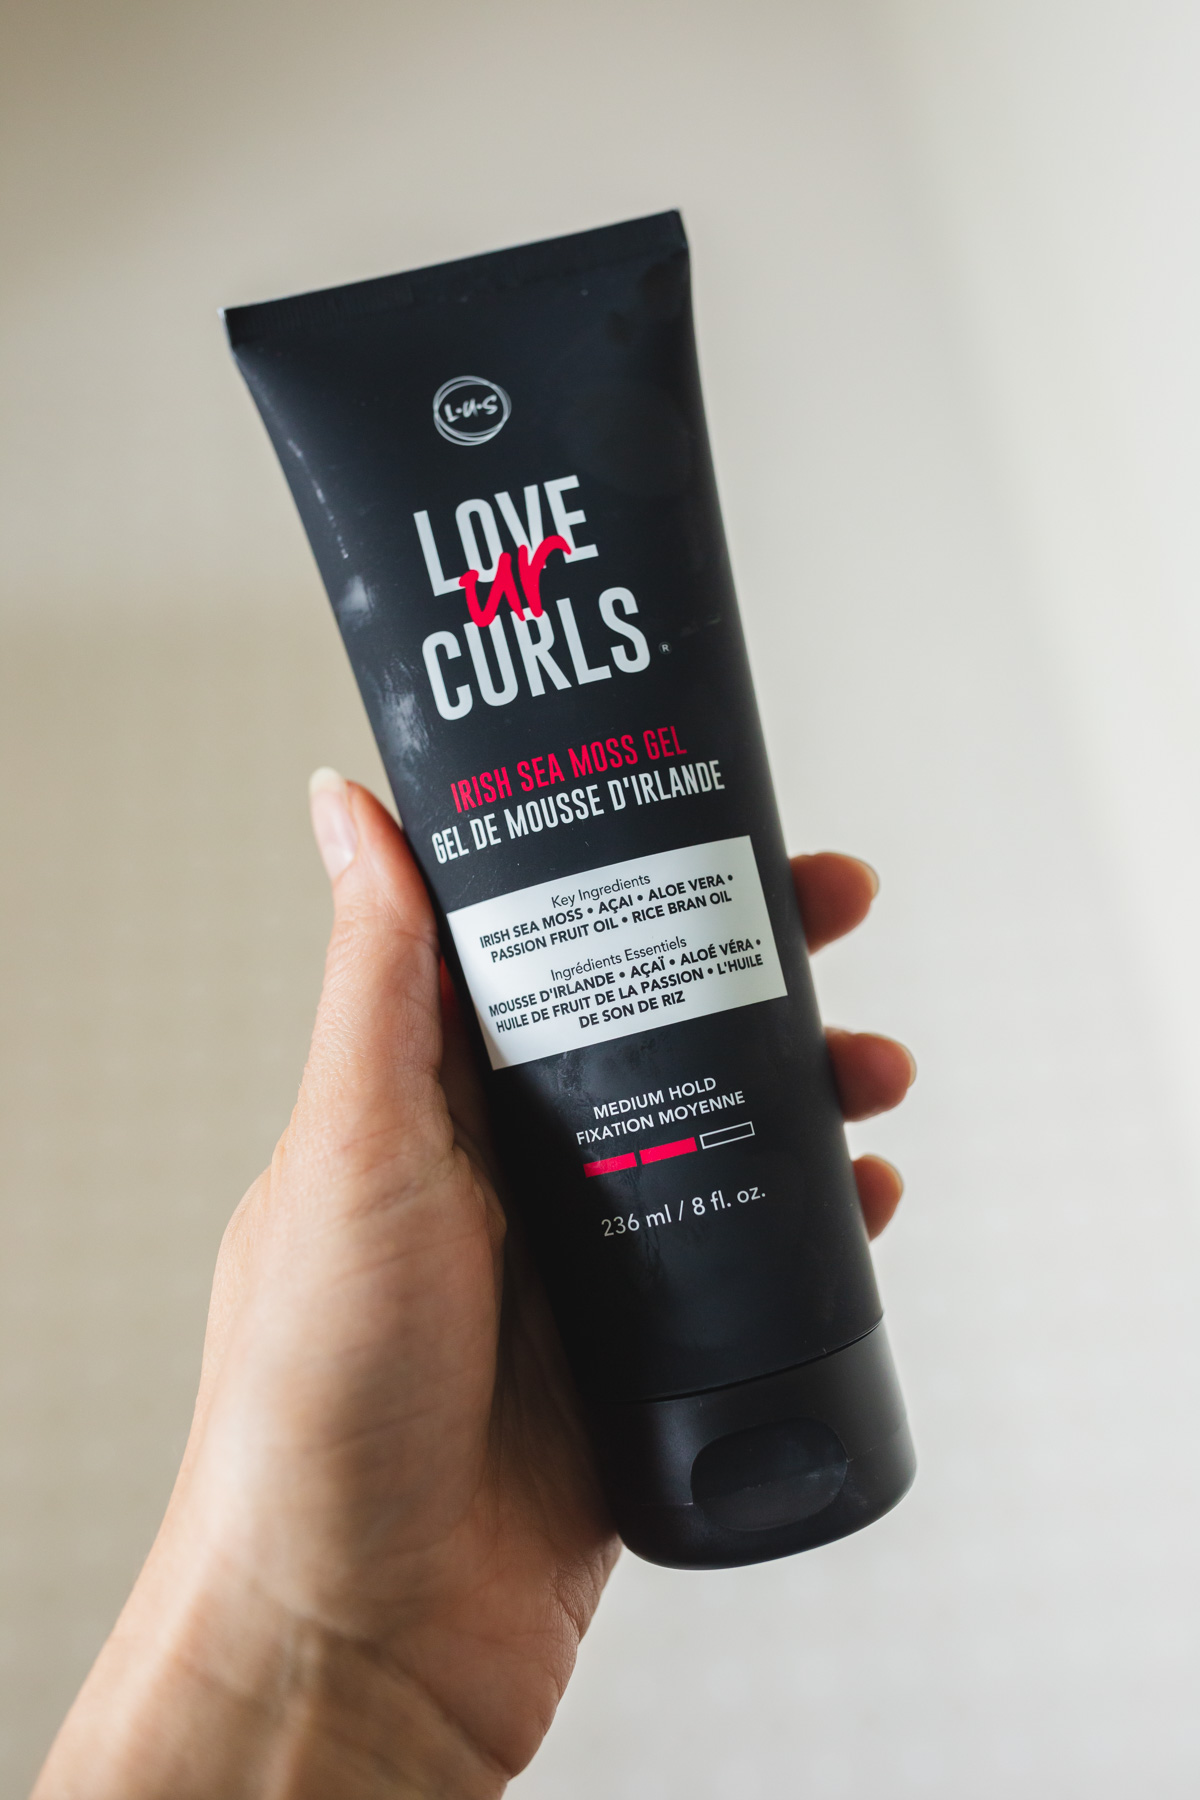
Not only do they hold your wave or curl better, but they can help with volume and frizz as well.
The trick is to apply to your hair while it’s still very wet so that it spreads through you hair evenly. You don’t want to use too much either, because if you do, yes, you can end up with the crunch. A little goes a long way in keeping your wavy hair looking great for days though!
How to Use: With your hair still pretty wet, add a dime to nickel-size amount of gel or favorite product, for hair mousse, look at the instructions on the bottle. I personally have been using this gel and love how it works. Spray a little bit of water on the gel to thin it and mix in your hands, then gently work through your hair. The trick is not using too much because no one wants that crunchy, wet look!
Scrunch your hair towards your head and hold for a second and then move onto another section. Once you’ve done this all over your head, take a microfiber wrap towel and continue to do the same scrunching motion to remove excess water.
Video: Wavy Hair Routine in 30 Seconds
Add Heat Protectant (When Using Heat Tools)
If you have fine or thin hair and frequently use hot tools for styling, it’s essential to use a heat protectant to shield your locks from damage. I’ve been using this detangler and heat protectant combo from Vegamour and love it. This lightweight product is perfect for fine hair as it won’t weigh it down or leave any greasy residue.
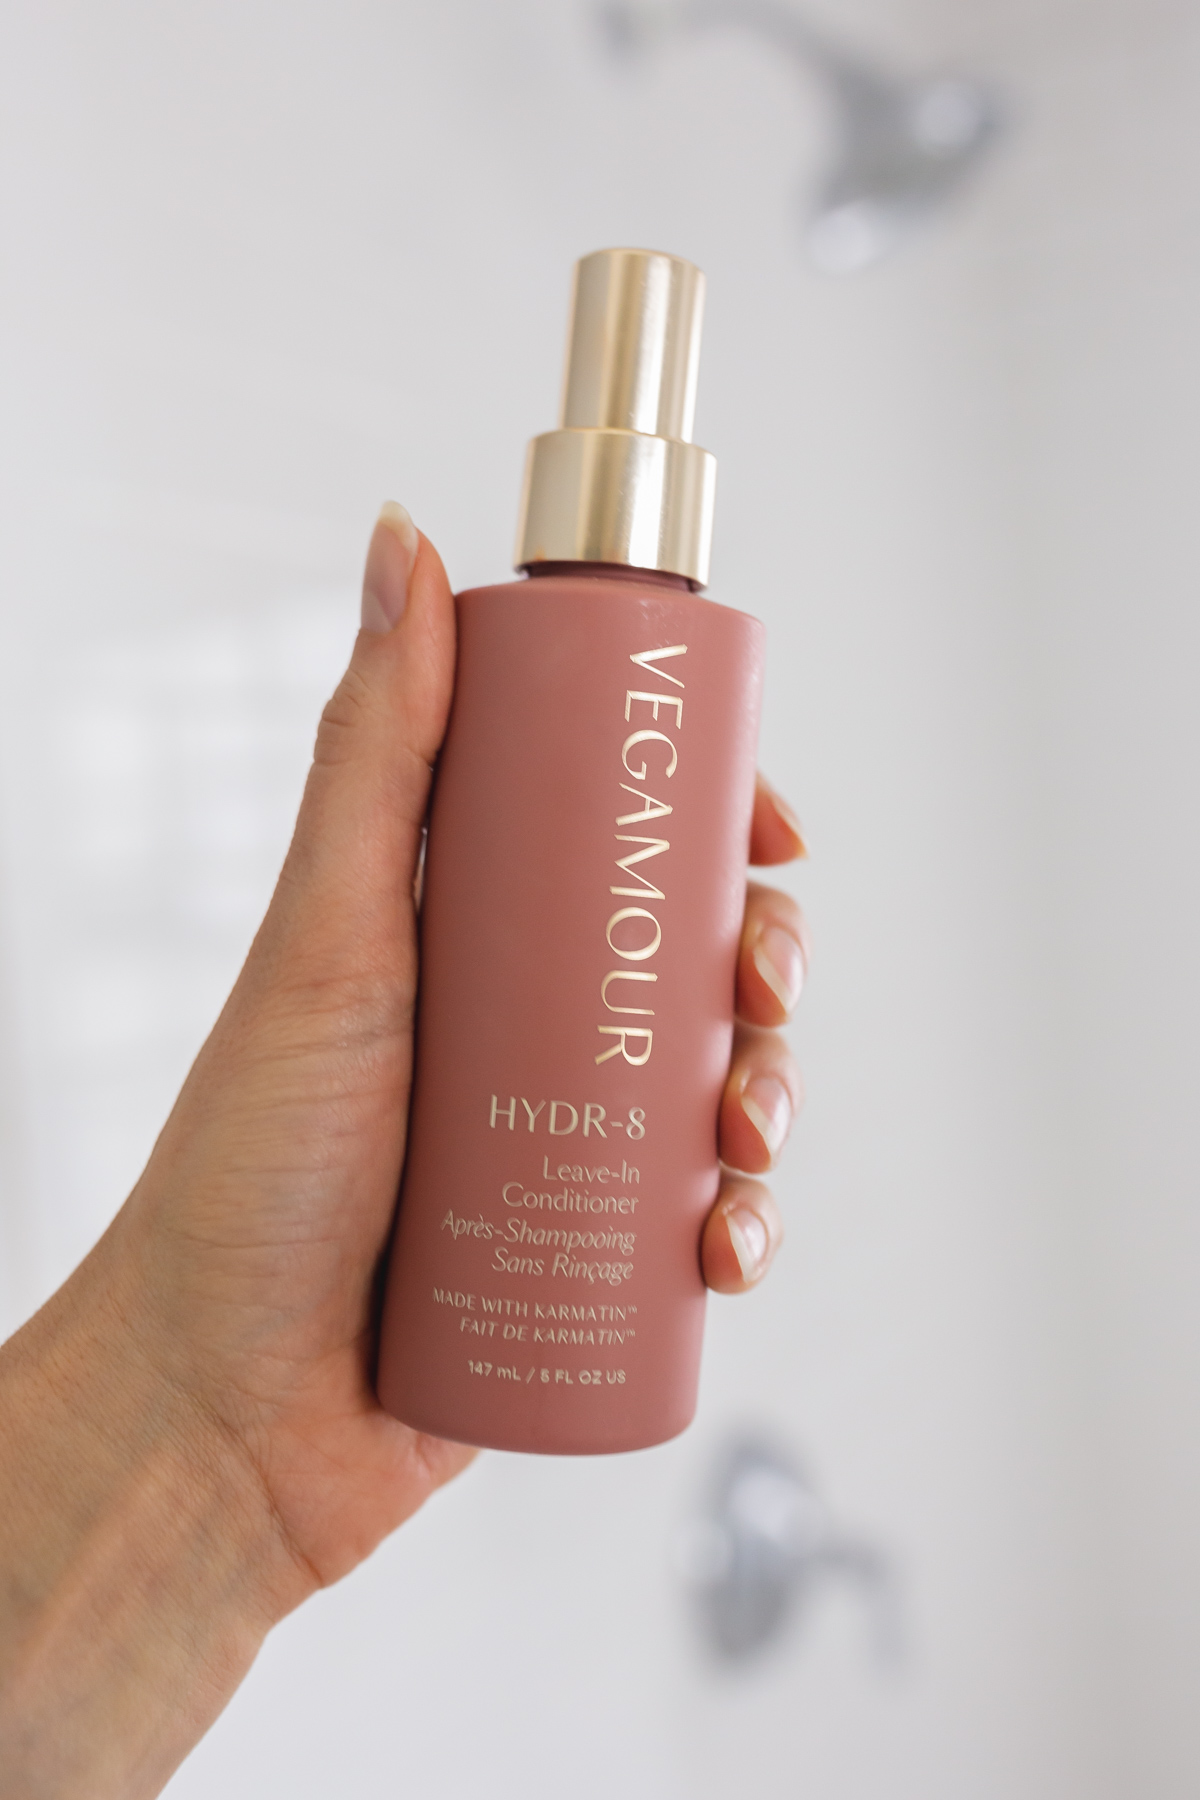
It gives you thermal protection up to 450°F, ensuring that your hair is adequately protected from the intense heat of styling tools. Whether you’re blow-drying, straightening, or curling your hair, this heat protectant will create a protective barrier to prevent breakage and dryness.
Step 5: Dry Your Waves
When it comes to managing wavy hair, the drying process can make all the difference in achieving the desired look. There are various methods for drying wavy hair, each leading to different results. These methods will work on any wavy hair type, but depending on yours, your results may look different than mine. My wavy hair type is probably a 2b or 2c, but honestly I wouldn’t get hung on your curl type! Wavy haired friends often have multiple different types of hair on their own head.
Whether you’re aiming for defined waves or a more natural, tousled look, the drying method you choose can impact the final outcome.
Air drying, for example, allows the hair to dry naturally without manipulation, resulting in a softer and more relaxed wave pattern that gives you more of a beachy waves look. On the other hand, using a diffuser attachment on a blow dryer can help enhance and define the hair’s natural waves while also adding volume and reducing frizz—more on this in just a second!
Additionally, the use of different products and techniques, such as scrunching or plopping (I haven’t tried plopping yet), can also play a role in how wavy hair dries and ultimately looks.
I’d recommend trying out a few different ways of drying your hair to decide what you like best for your hair. In the winter, I diffuse my hair more because I’m cold and I’ve loved the look of my waves. In summer, I’ll probably opt for more air drying because it’s just simpler and looks effortless.
Use a Microfiber Towel Instead of Regular Towel
Using a microfiber towel is better than a regular towel for a few reasons. First, microfiber wraps are much more absorbent than regular towels, making them more effective at quickly and efficiently drying off your skin or hair. This is due to the microscopic fibers in the towel that are able to trap and hold onto moisture, allowing for faster drying.
Additionally, microfiber towels are also softer and gentler on your hair. The fine fibers that make up a microfiber towel are much thinner than those in a regular towel, which makes them gentler on your strands.
After I add my gel, I use a microfiber towel to squeeze any excess water out of my hair by scrunching my hair into the towel and squeezing lightly with my fingers.
Blow Drying Wavy Hair with a Diffuser
This has been my go-to method for drying my wavy hair. It gets my scalp dry quicker which leads to more volume and smooth locks and I love that it actually makes my curls more defined.
The trick is to blow dry your wavy hair with a diffuser to enhance and define natural waves without causing frizz. There are a few different techniques that can be used to achieve great results – hover diffusing, cup and hold, and pixie diffusing. I always dry to about 80%, not 100% and get the best results. This is what my stylist recommended and it works great for me!
Best Diffuser Hairdryers for Wavy and Curly Hair
Hover Diffusing involves holding the diffuser underneath the hair and hovering it close to hair from roots without touching the hair. This technique helps to create volume and define the waves without disrupting the natural pattern. When I start drying my hair, I start with this method on medium heat and medium speed. I like to gently flip my head over and hover diffuse the underside too. This helps a lot with getting more volume on top! It also helps dry your hair at the root faster.
The cup and hold technique involves cupping the ends of the hair with the diffuser and holding it in place for a few seconds. This helps to enhance the waves and reduce frizz, while also adding volume and bounce to the hair. After 4-5 minutes of hover diffusing, I’ll do this and a combo of pixie diffusing.
Pixie method is a technique where the diffuser is used to lift and separate the hair at the roots, creating volume and definition. You scoop the hair up and press against your scalp on low heat and low speed.
When blow drying wavy hair with a diffuser, it’s important to use a low heat setting and to avoid touching the hair too much to prevent frizz. Try a combination of these types of diffusing to figure out what works best for your hair.
Plopping Technique
Admittedly, I haven’t tried this one, but I’ve seen it all over social media. The “Plopping” technique is a great way to air-dry your hair for a more defined and less frizzy look. To start, lay a big cotton t-shirt or microfiber towel in front of you on a flat surface. Lean over it and gently “plop” your damp hair in the middle of the towel.
Next, wrap the shirt or towel around your head and hair, making sure to cover the entire length of your hair. Once your hair is covered, secure the towel at the base of your neck to keep it in place.
Allow your hair to air dry like this for 30 minutes to an hour. This will help to define your natural curls or waves, and minimize frizz.
The “plopping” technique is especially great for those with curly or wavy hair, as it helps to enhance natural texture and reduce the appearance of frizz. Give it a try and enjoy the beautiful, defined curls or waves without the need for heat styling or excessive product use. Great for when you have the time and don’t want to put too much work in.

How to Air Dry Wavy Hair
Lastly, air drying wavy hair can be a great way to style your natural waves without using any styling tools to avoid heat damage. Start by gently squeezing out excess water using a microfiber towel to avoid causing frizz. I like to spray on that leave-in conditioner and heat protectant too, despite using no heat—it adds a little more moisture to my hair that helps it look it’s best.
You can add a sea salt spray too to add more texture to your hair. If using a sea salt spray, make sure to not overdo it because it can quickly go from textured to crunchy.
As your hair starts to air dry, periodically scrunch your hair to encourage the natural wave pattern. This can help to define and enhance your waves without the need for heat styling.
Once you’ve applied the lightweight leave-in conditioner and scrunched your hair, allow it to air dry completely without touching it. This helps to avoid disturbing the natural wave pattern and reduces the risk of frizz.
By following these steps, you can achieve beautifully air-dried beachy waves that looks natural and healthy without the use of heat styling tools.
Finish with a Hair Oil
After your hair is dry, you can add a hair oil. This adds softness and moisture to your hair and if you have any of those crunchy areas, this will help break them up. I’ve been using one pump of this hair oil and rub it between my hands and then smooth over my hair—voila!
Step 6: Finish Off Your Style
After styling your hair, the final step is to finish off your look with a lightweight hair oil to your dry hair. Add a few drops of hair oil to your ends to add more shine! This is totally optional, but I’ve found it to be helpful in adding shine and reducing frizz. Look for a lightweight formula that won’t weigh down your hair or make it look greasy. Here are a few good options to try:
To maintain volume while using hair oil, focus on applying the product to the mid-lengths and ends of your hair, avoiding the roots. Only use a small amount of product to avoid hair looking greasy. If your hair is looking a bit crunchy from the gel, this is a great way to break that up. Just a few drops will do the trick!
To further maintain volume, try to limit the amount of heat styling and avoid using heavy products. You can also use a light hold hair spray for extra hold, but depending on your hair type, it might not be necessary.
How to Protect Your Waves While Sleeping
To protect your waves while you sleep, start by pulling your dry hair into a high ponytail and securing it with a satin or silk scrunchie. This keeps your waves intact and prevents them from getting tangled or flat while you toss and turn during the night. Additionally, using a satin pillowcase or silk pillowcase reduces friction on your hair, preventing breakage and frizz.
To further protect your waves, consider using a silk headwrap to keep your hair in place and shield it from rubbing against your bedding. This helps to maintain the shape and smoothness of your waves while you sleep. I haven’t tried it (I’m a little too lazy for that), but some people swear by it!
In the morning, release the ponytail and gently shake your hair to refresh your waves. This will help to add volume and bounce back into your style. Finish off by applying a few drops of hair oil to add shine and reduce any frizz that may have occurred during the night.

How to Refresh Your Waves
Knowing how to refresh your hair is an essential part of your wavy hair routine. Plus, it’s super simple! To refresh your waves, start by misting your hair with a fine mist water sprayer. This will help rehydrate your curls and bring them back to life. Make sure to focus on the areas that have lost their bounce, such as the ends and the crown of your head. You can also mix in a little bit, about a quarter or two size of your favorite leave-in conditioner to the bottle. Shake it up, and you’ll get a little bit of conditioning too!
After misting your hair, you may want to add a small amount of your favorite styling product. This could be a curl refreshing spray, a leave-in conditioner, or a lightweight styling cream. If you have added any product in your first styling, misting with water can reactivate the product that’s already in your hair, so if you add more, you can add sparingly.
Apply the product to the mid-lengths and ends of your hair, and then use your fingers to scrunch and tousle your waves. This will help to redefine your curls and give them a fresh, bouncy look.
For best results, avoid using too much product, as this can weigh down your hair and make it look greasy. Instead, start with a small amount and add more as needed.
For any spots that look greasy, use a dry shampoo to refresh hair! I’m really bad about touching my hair, so I typically have to do this after a day or two. Here are a list of my favorite non-toxic dry shampoos.
Once you’ve misted and styled your waves, allow them to air dry or use a diffuser attachment on your hair dryer to speed up the process. And voila! Your waves will be refreshed and ready to take on the day.
I’ve absolutely loved embracing my naturally wavy hair and playing around with different methods of styling it to get different looks. I have healthier hair that looks and feels better.
If you’ve been wanting to love your natural hair, I hope this wavy hair routine gives you the confidence to try something new and get ready for perfect hair days! I’m definitely no hair expert, so if you feel like an amateur, know that anyone can do this. Enjoy those natural waves if you’ve got them!
BTW, how to make a DIY hair oil for growth at home, the haircare routine that made my hair grow in just 6 weeks.


You must be logged in to post a comment.